Lead Flows
Automatically collect visitor information like name, email, phone, company, or custom fields during chatbot conversations. Forms can show all fields together in the website chat widget, or ask one question at a time in the conversation.
How to get there: Go to AI agents in the left menu → click your chatbot → Forms in the sidebar.
Overview
Lead flows let you define which information to gather from visitors and when to ask for it. You can create multiple lead flows with different triggers and fields: they work independently and can even complement each other.
Default: "Get in touch"
Every new Boei account starts with a Get in touch lead flow already set up on the first chatbot. It's a form-mode flow triggered by AI-detected intent (pricing, quotes, booking, contact-sales, or human handoff) and collects name + email. This is what powers the "Lead capture" toggle on the onboarding wizard's Customize step.
You can rename it, extend its fields, change its trigger, or delete it entirely from AI agents → Forms. It behaves like any other lead flow once you're in the editor.
Migrated "Customer information" flow
Chatbots that used the earlier Customer information collection settings are automatically converted to one regular lead flow. The migrated flow keeps the same enabled fields and timing as closely as possible, so there is one lead-collection system rather than two competing sets of questions.
You may see a flow named Customer information after this migration. Review it under Forms like any other flow. In particular, check its trigger, field order, required fields, and welcome message. The old customer-information switches no longer run alongside it.
Creating a Lead Flow
Click New form to start from scratch, or choose an example:
- Contact Form: Collects name and email before chat starts (Form style)
- Quote Request: Collects name, email, company, and phone when visitors mention keywords like "quote" or "pricing" (Form style)
- Conversational form: Naturally collects email and name during the AI conversation (Conversational style)
- Sales Qualifier: Collects email, name, company, and phone after a few AI replies (Conversational style)
Completion message
Use the completion message to tell visitors what happens after they share all required details. Only promise a reply if your team will provide one. For example: "Thank you. Our team will reply during our opening hours." The bot may repeat that promise for the same request after all required details are collected. It must not use it when a visitor skips required details, refuses to share them, or asks a new question later. A success message does not send an email by itself. Set up alerts in the form’s Notifications card or your agent’s Notifications page.
Editing a Form
The editor has four cards. Click Change to open a card and Done to close it. Click Update to save your changes, or Create for a new form.
- Fields: Choose the style, add fields and drag them into order. Click a field to edit it. Extra options, such as a custom AI question, are under Advanced.
- When and where: Choose the channels and when the form starts.
- Notifications: Set up an alert when this form is completed, if wanted. You can also share the collected details in a notification at the end of the conversation.
- Settings: Change the form name, welcome message, success message and other options.
Click Preview beside Add Field to check your draft before saving. On wide screens, a preview also stays beside the editor. Use Preview channel below it to see how the form works on each channel. Previewing does not save changes or book a meeting.
Active on
Under When and where, choose All channels or Selected channels. The choices are Website widget, API, WhatsApp, SMS, Email and Telegram. For example, select Website widget and API when you only want this form on your website and in your own app.
Existing forms stay active on all channels until you change this setting. Their saved names stay unchanged. The Conversational form example starts with Website widget and API selected.
A form only starts on channels where it is active. On API and messaging channels, both styles ask questions in the conversation. An inline form is only shown in the website widget, including the shared chat page.
If you change the allowed channels while a visitor is filling in a form, an unfinished collection on an excluded channel stops. Known contact details and completed submissions stay saved.
Style
Form
Displays an inline form inside the chat widget. The visitor fills in the fields and clicks a submit button. On API and messaging channels, the agent asks one question at a time.
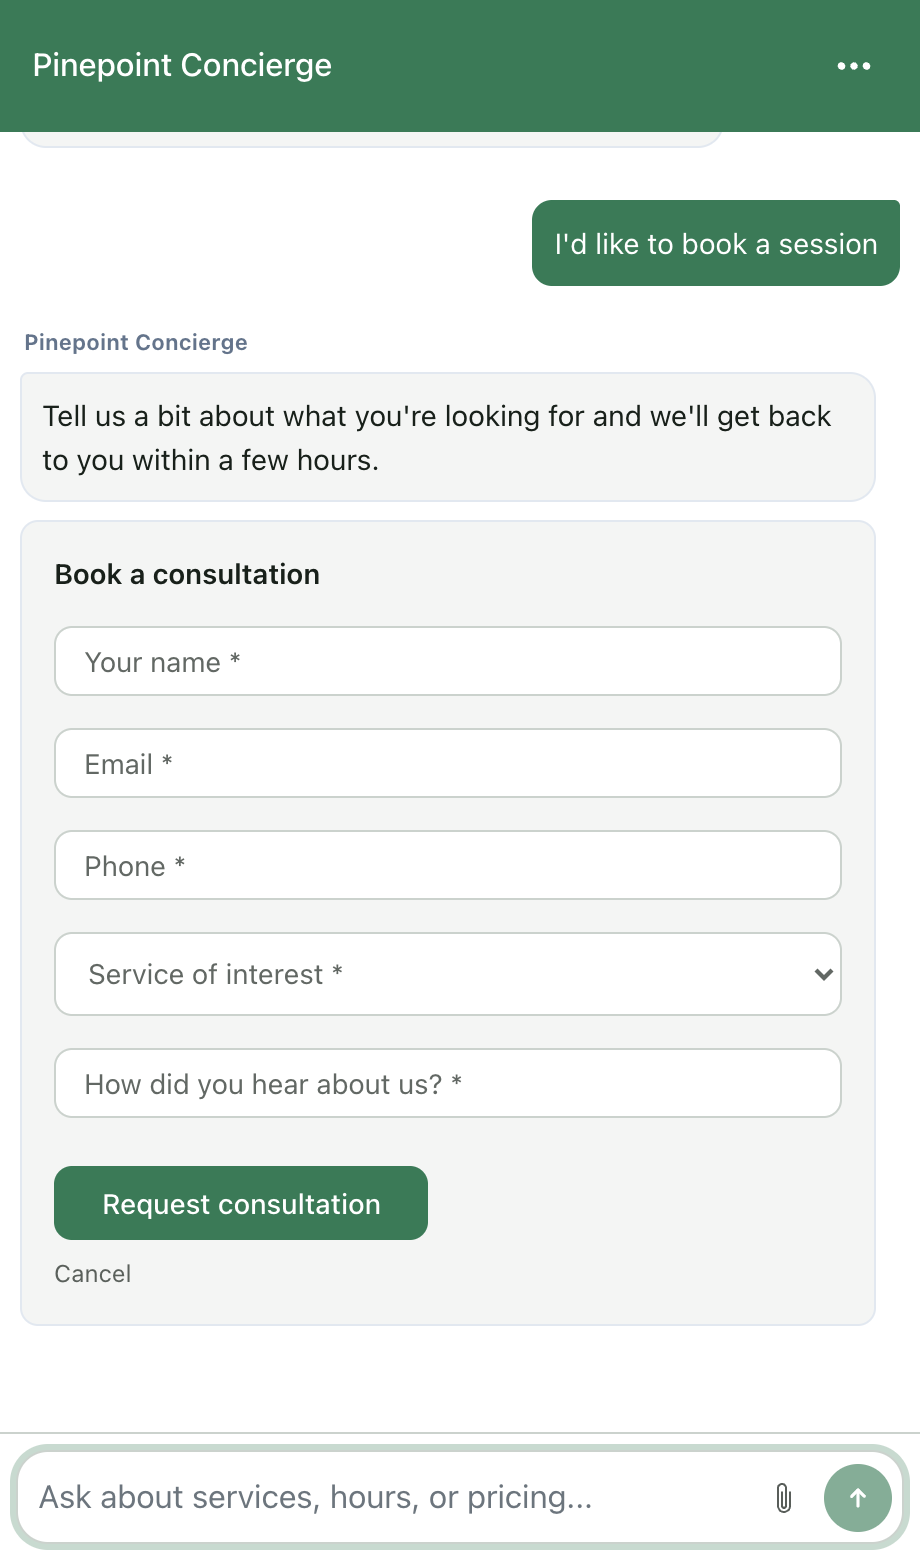
Best for:
- Collecting multiple fields quickly
- Structured data entry (dropdowns, multi-select)
- Before-chat gating
Conversational
The agent asks one question at a time in a conversational manner. The visitor answers in their own words, and the AI extracts the information automatically.
Best for:
- A more natural, conversational experience
- Visitors who might abandon a long form
- Combining lead collection with answering questions
How it works:
- When triggered, the AI starts asking for the first field at the end of its response
- The visitor answers (or asks a different question: the AI answers it, then asks again)
- Once a field is answered, the AI moves to the next one
- Required fields are asked up to 2 times before being skipped
- Non-required fields are asked up to 2 times, then skipped if not answered
- When all fields are collected (or skipped), the lead flow completes and normal conversation resumes
The AI stays helpful throughout: if a visitor asks a question instead of answering, the AI answers their question first and then asks for the field again. This keeps the conversation natural while still progressing through the fields.
For dropdown/multi-select fields, the answer options appear as clickable buttons in the chat, making it easy for visitors to respond with a single tap.
When Visitor Details Are Already Known
If Boei already knows a visitor's email address, or your website sends it with the chat, Boei skips the email and name questions. If no other information is needed, the lead flow does not start. It creates no new lead submission and sends no notification for that skipped flow.
If other details are still missing, the flow collects those details. A form with a Booking field still opens so the visitor can choose a time slot.
Triggers
Before Chat
The lead flow appears when the visitor sends their first message, before the AI responds. In the website widget with Form style, the visitor must complete the form before the conversation starts.
Best for: Gating access, ensuring you always have contact info.
After Replies
The lead flow activates after the AI has sent a certain number of replies. Set the number in the Number of Replies field.
- 1 reply: Activates immediately: the AI's first response already includes the first field question
- 3 replies (default): Lets the visitor ask a few questions first
Best for: Letting visitors see value before asking for information.
In Conversational style, this is seamless: the AI simply starts adding a field question at the end of its normal responses. With Form style in the website widget, the form appears after the specified number of replies.
On Keyword
The lead flow activates when the visitor's message contains one of the configured keywords (e.g., "demo", "pricing", "contact").
Best for: Capturing leads when visitors show specific intent.
AI-Detected Intent
Instead of a fixed keyword list, you can describe the situation in plain language and let the AI decide when to activate the flow. Fill in the Activation condition field with something like "visitor asks about admissions or wants to enroll a child".
Best for: Situations that are hard to pin down with keywords alone, such as intent expressed in many different ways or across multiple languages.
Timing note (Conversational style): When the AI detects the condition, it acknowledges the visitor's message on that turn and then asks for the first field on the next reply. This means there is a one-turn delay between activation and the first field ask. In the website widget, Form style opens the inline form when the AI triggers it. API and messaging channels always collect details through questions.
While a workflow is running, new AI-detected lead flows, including email follow-up, do not start on their own. Add a contact collection step to the workflow to request those details. Answers to an already active lead flow are still saved.
Using Multiple Lead Flows
You can create multiple lead flows that work together. Each one activates independently based on its own trigger, and they don't interfere with each other.
Example setup:
- Conversational flow with trigger "After 1 reply": Seamlessly collects email and name during the conversation as the AI answers questions
- Form flow with trigger "On Keyword" for keywords like "quote", "demo", "pricing": When the visitor shows high intent, shows a structured form with additional fields like company, phone, and budget
The form will be pre-filled with any information already collected by the AI conversation flow. So if the AI already got the visitor's name and email, those fields show up filled in: the visitor only needs to complete the remaining fields.
This gives you the best of both worlds: a low-friction conversational experience for basic info, plus a structured form for high-intent moments.
Fields
Standard Fields
- Name: Visitor's name
- Email: Email address (validated)
- Phone: Phone number (validated)
- Company: Company or organization name
- Job Title: Visitor's role
- Booking: Calendar booking picker. Choose Add Field → Calendar booking. If setup is missing, a message links to Integrations. Connect Google Calendar, select a calendar and enable booking before adding this field. Your plan must support booking. Set the meeting duration in the field editor. See Calendar booking in the chatbot for setup and behaviour, and Google Calendar integration for the underlying account connection.
Custom Fields
Click Add Field → Custom Field to create your own. Custom fields support these types:
- Text: Free-form text input
- Email: Email with validation
- Phone: Phone number with validation
- Textarea: Multi-line text
- Dropdown: Single-select from predefined options
- Multi-select: Choose multiple options
- Consent: A tickbox the visitor must check, e.g. for marketing consent or terms acceptance (see below)
Consent Field
Use the Consent type when you need an explicit, auditable agreement from the visitor, such as:
- "I agree to receive marketing emails"
- "I accept the terms and conditions"
- "I consent to my data being processed for follow-up"
How it works:
- The field's Consent text (the Label) is shown next to a checkbox in the form.
- When the visitor ticks the box and submits, Boei stores three things alongside the contact: the exact consent text shown, a timestamp, and the fact that it was accepted. This snapshot stays intact even if you later edit the consent text on the form.
- If the consent field is marked Required, the form cannot be submitted until the visitor ticks the box.
- The accepted consent appears in the inbox header for that conversation (e.g.
I agree to receive marketing emails: ✓ accepted 2026-06-08 20:08) and in the system message inside the thread.
In a conversation: With Conversational style, and on API and messaging channels, the agent asks for explicit agreement to the configured consent text. There is no checkbox. The system records an accepted value, the consent text and a timestamp when it accepts the reply as agreement. The agent is instructed to ignore refusals and unrelated replies when collecting consent. The checkbox described above is used for inline forms in the website widget.
Field Settings
Each field has:
- Label: The name of the field. In Form style, this is shown to visitors as the field label. In Conversational style, this is used internally to organize your data.
- Type: The field type (text, email, dropdown, etc.)
- Required: Whether the field must be answered
- AI question (under Advanced): A custom question the AI will ask for this field. Leave empty to use the default. The question is automatically translated to match the visitor's language.
- Answer options (dropdown/multi-select only): The list of options. Use the + Add Option button to add options and the − button to remove them.
Required vs Non-Required Fields
In Form style, required fields are marked with an asterisk (*) and the form cannot be submitted without them.
In Conversational style, the behavior is different because the AI can't force a visitor to answer:
- Required fields are asked up to 2 times. If the visitor doesn't answer after 2 attempts, the field is skipped and the AI moves on. This prevents the conversation from feeling pushy.
- Non-required fields are asked up to 2 times. If the visitor doesn't answer after 2 attempts, the AI moves to the next field.
When all fields have been either answered or skipped (after their maximum attempts), the lead flow completes.
Reordering Fields
Drag fields using the grip handle on the left to change their order. In Conversational style, the AI asks for fields in this order.
Transcript Notifications
You can build a rule that only fires when lead information has been collected.
How to get there: Go to AI agents → click your chatbot → Notifications. Click Add rule (or the Email me every lead template) and add the Lead form was submitted check.
The check fires when all required lead flow fields have been provided. This means:
- If a required field was asked twice but the visitor didn't answer, the check does not match
- If all required fields have actual values (even if non-required fields were skipped), the check matches
- The check only makes sense when you have at least one lead flow configured
This is useful when you only want to be notified about conversations that resulted in actionable lead information. For conversations where contact info was provided but not all required lead fields, use the Email or phone shared in chat check instead. See Notification Rules for the full rule editor.
AI-Triggered Lead Form Follow-Up
The AI can now trigger a lead form mid-conversation when it detects a qualified intent, for example when a visitor mentions their budget, timeline, or asks to be contacted. The visitor sees the form appear as a follow-up card inside the chat, pre-filled with anything the AI has already collected.
This runs alongside the classic "Ask questions upfront" and keyword-triggered setups, it does not replace them. Use it when you want the AI to decide the moment based on conversation signals rather than a fixed keyword list.
Welcome Message
Set an optional welcome message that appears before the lead flow starts:
- Form style: Shown as a chat message before the form appears
- Conversational style: The opening message before the AI starts asking for details
Tips
- Start simple: Begin with just email and name, then add more fields once you see good completion rates
- Use Conversational style for "After Replies" and "On Keyword": The seamless experience keeps visitors engaged instead of interrupting them with a form
- Use Form style for "Before Chat": Getting structured data upfront is efficient when visitors expect a sign-in step
- Combine both: Use an AI conversation flow for basic info (email, name) and a keyword-triggered form for detailed qualification (company, budget, use case). The form pre-fills with already-collected info.
- Mark only essential fields as required: Each field gets at most 2 requests in AI mode, whether required or optional. The AI answers visitor questions first, then appends one optional request for details.
- Customize AI questions: Default questions work well, but custom questions matching your brand voice convert better. For example, instead of "What is your email?" try "Where can we send you a follow-up?"
- Test with your chatbot: Have a conversation with your chatbot to see how the lead collection feels from the visitor's perspective
 Powered by ProductLift